I chose to try linocut printing for my first 2D project. I carved out a design showing both the front and back of the apron.
Friday, 10 May 2024
First preparations for 2d outcome
3d Design Improvement
At the sewing workshop, I intend to use a plotter cutter to cut my pattern from vinyl. To begin, I prepare the files in EPS format. Then, using the CorelDraw program, I flip the image as needed and proceed to print it using the plotter cutter machine. This ensures that the pattern is cut out with precision and accuracy.
I've never heard about this material or technique for turning a pattern into fabric before. The technicians at the sewing workshop suggested it's quicker and easier than embroidery, which I was considering. Embroidery involves complex software that would take more time to learn than I have available right now.
The printing and cutting process is surprisingly fast, taking only a few minutes to complete. Once finished, the next step involved removing the pieces of the pattern that weren't needed. I decided to start with a leaf design and tested it on PU leather. The technicians weren't sure if it would adhere properly to PU leather, so I decided to test the material myself. After finishing the removal process, I took my leaf design and the material and used a heat press machine to combine the design with the material. The entire process took just 10 seconds at 150 degrees Celsius.
That's the final outcome: the vinyl material adhered to the PU leather. The process was incredibly fast, so I'll definitely consider it for my 3D projects. The most time-consuming part was the removing, but overall, it's still a quick process.
Monday, 6 May 2024
The process of creating a tote bag, small case and an apron as a 3D design.
I started by finding free patterns online for the apron, small case and tote bag I wanted to make. I began by prepping patterns and materials for a small case. I decided to prepare three material options: natural cotton, grey cotton, and PU leather for added variety and choice.
For both projects, I used two material variations: natural cotton and grey cotton. Additionally, I created several material samples sized to fit the pockets of both the apron and tote bag. The next step will be to visit the sewing workshop and experiment with different techniques to create patterns on the pockets. One option I'm considering is using a pre-made linocut with oil-based inks.
Then, I moved on to preparing patterns for both the tote bag and aprons. After printing them on A4 paper, I carefully cut out the shapes. I chose a small size for the apron since it's commonly used and versatile for different activities. Once all the pieces were cut, I used clear tape to put them together. This made sure everything stayed in place while I worked on the project.
Devolopment of Idea: Bowl
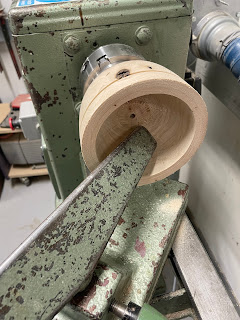
Starting my 3D bowl project, I'm excited to experiment with combining wood and epoxy resin for a unique and modern aesthetic. First, I used different coloured wood pieces and glued them together to create a mix of tones. Then, I waited 24 hours for the glue to set. After that, I marked the centre point to guide where to attach the shaping tool from the machine for forming the bowl shape.
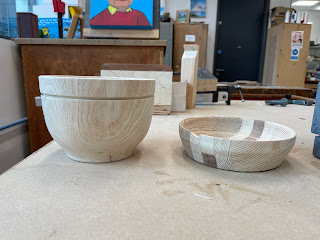
Using a wood lathe and specialized tools, I shaped the wood into a bowl form.
Roughing Gouge: This tool helps shape the inside and outside of the bowl by cutting away wood.Scraper: It's used to smooth and refine the surface of the bowl after shaping.
Spindle Gouge: helps shape curves and add detail (Woodworking Wisdom, 2020).After shaping the bowl with the wood lathe and special tools, I finished by smoothing the surface using sandpaper.
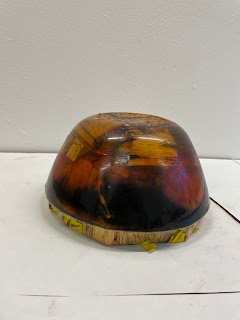
Unfortunately, I couldn't add epoxy resin to the finished bowl shape. So, my next step was to mix the wood with epoxy resin before moulding them into a bowl shape. To do this, I found a plastic bowl with dimensions no larger than 20x26 cm. Then, I placed the wood pieces into the plastic bowl and added tape to the top to prevent them from coming out. After that, I mixed the epoxy resin and poured it into the bowl to cover all the wood. To recreate a fire theme, I used a combination of orange and black colours of epoxy raisin.
After adding the epoxy resin over the wood, I used a vacuum chamber to get rid of bubbles. Because the chamber isn't huge, I had to use a plastic bowl no bigger than 20x26cm. Bubbles are common in epoxy resin because air gets trapped inside the mixture. When the resin hardens, these bubbles can spoil the finish. The vacuum chamber helps by reducing air pressure, which makes the bubbles rise up and disappear, leaving the final product smoother (Wier, n.d.).
Reference List:
Wier, A. (n.d.). Ways to improve resin casting: pressure and vacuum chambers. [online] Available at: https://www.betweenthebolterandme.com/2017/05/ways-to-improve-resin-casting-pressure.html [Accessed 6 May 2024].
Tuesday, 30 April 2024
Devolopment of Idea: Pencils Case
At this stage, I've experimented with different designs for pencil cases, using a previously created pattern inspired by the American robin, and explored various colour variants to enhance its visual appeal. Considering canvas cotton as the material for the pencil case not only prioritizes environmental friendliness but also ensures coherence with my other designs such as tote bags and aprons.
The first design assumes pens will be inserted from the top, while also offering the option of closure with a lock shaped like a white oak leaf. The light grey, orange, and green colours work well together, creating a balanced and lively look. The grey acts as a calm background, letting the orange and green stand out with their bright and energetic feel.
In the second project, objects like pencils are stored in compartments made just for them. The colour scheme is like the first design, with light grey and orange, and now black is added in too, giving it a sharper contrast. The design involves folding the project in half and securing it with a string.
In the second project, objects like pencils are stored in compartments made just for them. The colour scheme is like the first design, with light grey and orange, and now black is added in too, giving it a sharper contrast. The design involves folding the project in half and securing it with a string.
The last project takes inspiration from an envelope's design. It showcases a warm colour palette including yellow, orange, and red, which are neighbouring shades on the colour wheel, known as analogous colours. To secure it, an elastic band and button closure are incorporated. The pattern features motifs of the American Robin and a leaf reminiscent of the White Oak tree.
Sunday, 28 April 2024
Wednesday, 24 April 2024
Development of ideas: Apron
To start developing my apron design, I drew the outline of a woman's body. I chose to depict a woman because research shows (target market blog post) that 81% of customers in the souvenir market are women. I used a Sketchbook app to draw the outline of the body.


In my project, I want to emphasize simple and practical design for my aprons. I aim for them to be useful in everyday tasks like cooking or for artistic activities. I'm considering adding pockets that can store small items, depending on the purpose. For artistic use, I'm thinking about including compartments in the pockets to hold narrow tools like brushes or cutting tools.
1) www.parachutehome.com. (n.d.). What is Organic Cotton? Sustainable Cotton Fabric Guide | Parachute Blog. [online] Available at: https://www.parachutehome.com/blog/what-is-organic-cotton-and-sustainable-cotton# [Accessed 28 Apr. 2024].
Subscribe to:
Posts (Atom)
Reflection: Art Portfolio 2
In Art Portfolio 2, I learned techniques for developing ideas. The classes showed me how to evolve, my ideas, and change and improve ...
-
I stared creating the logo in Canva. From the available templates , I choose the one that would best suit my ethnic jewellery project- Roots...
-
April Vollmer is a New York artist. She studies the mokuhanga technique and Japanese woodcut printmaking after receiving her Master of...
-
I took advantage of the opportunity to have access to the ceramics studio at DMU and started working on my ceramic project. First, for the p...


